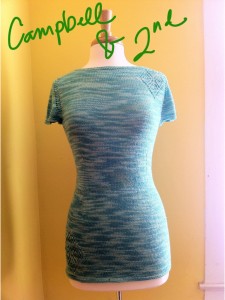
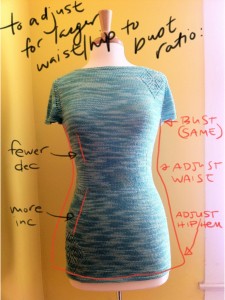
As I was designing and knitting Campbell & 2nd, I knew that it would be one of those patterns that would be a great canvas for some modifications to optimize fit. It’s a pretty form-fitting, curvy shape, and while the pattern follows standard sizing guidelines, most bodies in the real world don’t follow standard guidelines (but you knew this, right?)! The model above is a size small, with a 32″ actual bust.
What’s ease?
Ease is the difference in measurements between your actual measurements and the finished measurements of the garment. A slim top like Campbell & 2nd could have smaller measurements than yours, while a relaxed fit rustic cardigan could measure several inches more than your actual body measurements.
I recommend choosing a size that provides from 2” negative ease or up to 1” of positive ease compared to actual full bust measurement. As written, measurements are calculated for an imaginary knitter choosing a size with 0″ ease, or a size that exactly matches the knitter’s bust measurement. This provides a snug, but not tight, fit through the shoulders and upper body. Regardless of other modifications, that will provide a good starting point to have a flattering fit through the upper body, and avoid loose, baggy sleeve caps and a drooping neckline. On other top-down sweaters, you may want a bit more ease depending on sleeve and neckline shaping.
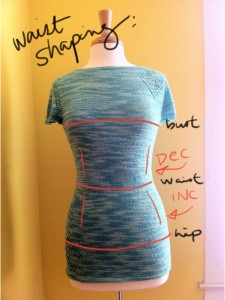
Past the upper yoke and raglan shaping, you get to the full amount of bust stitches. From there, a series of decreases placed in two columns at the front, and two at the back, narrow down the body tube to the waist, and then increases along the same shaping lines bring the number of stitches up to the hip circumference, which measures a greater number of stitches than the bustline. On Campbell & 2nd, both the waist and hip circumference have extra ease added to standard sizing measurements, if knitted at 0″ ease, to avoid a too-clingy fit along those areas. That’s a general overview of the basic shaping of this, and many, of my top-down sweater shapes.
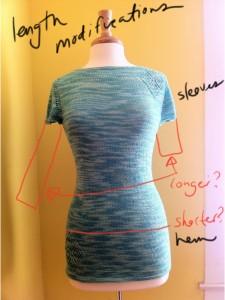
So one of the first, and easiest, modifications to consider is altering length. Campbell & 2nd is an extra-long, lean shape, but it can easily be ended sooner than the written length. Just choose your end length and then work the garter stitch trim before binding off.
Another pretty easy length modification is sleeves. I use cap sleeves on this and a lot of my other top-down patterns, because they’re great for multi-season wear and allow for layering. But making short, half, 3/4, or full-length sleeves is really simple! When you slip your held sleeve stitches onto the needles, rather than working the trim on smaller needles as written, use your larger needles (just like the body) and work in decreasing rounds to your finished length, and then switch to smaller needles for the finishing trim. How much should you decrease? Really it depends on your arm length and shape, and the best way is to multiply row gauge times desired length, and divide that up by how many decreases you need to reach wrist, mid-forearm, or elbow circumference. Keep in mind to add a bit of ease unless you want a skin-tight fit. As a rough guide, I would work even for a few inches along the upper arm, and then decrease 2 st at the “seamline” along underarm, every 5-6 rows until I reached my desired circumference. Why every 5-6 rows? I pulled that number from Elizabeth Zimmerman’s EPS percentage method sweater shaping, and on most gauges, it works beautifully.
Wrap that unique body in a sweater that fits it in a way that you deserve…
So let’s talk about modifying the body past the raglan line to fit your shape. As I said before, many (most?) of us don’t conform to standard shaping. Standard shaping should really be a jumping off point, almost all knitting pattern use it because the variables in fitting a wide range of sizes is really too great to publish in each individual pattern. For a beautiful fit, it’s important to customize your sweater shape to fit YOUR measurements and individual shape. No guilt, no shame, no body-bashing; just look at the measurements that make you… YOU, and wrap that unique body in a sweater that fits it in a way that you deserve. So where do we start? With your measurements.
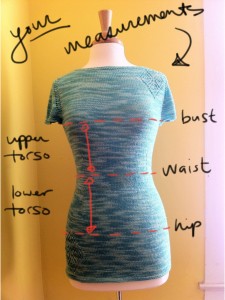
Grab your tape measure and jot down the following: Bust Circumference, Waist Circumference, Hip Circumference. It’s also handy to have a length measurement from under the fullest part of your bust (where your bra band sits) to where your waist begins, and from your waist to the fullest part of your hip.
From there, you can compare your measurements to the finished measurements of the sweater. Your bust should measure from two inches larger to about an inch smaller than the finished bust measurement of your chosen size. Then, look at the waist and hip measurements. Are the pattern measurements a few inches larger than your actual waist and hip measurements? Yes? Then you’re good to go. Cast on and go nuts. No? Then it’s probably time to mix things up a little.
Remember when I said earlier that the pattern, as written for 0″ ease, had some extra ease through the waist and hips, to avoid being too clingy? This is what you want for your finished garment, too. Some ladies can pull off a bit of negative ease in the waist and hips, others, not so much. Trust your judgement based on pieces that you already wear that make you look and feel gorgeous to know if more or less ease works for you. If you always have to pull down tops because they creep up past your hips and toward your stomach, you’ll probably want some extra ease compared to those garments.
To add ease, take your waist and hip measurements and add at least 2 or more inches to each measurement. Not sure how much ease to add? Grab a well-fitting t-shirt or other top of a similar shape from your closet and check its measurements.
For example: I’m 5’8″ and wear a size medium top, but my waist and hips measure proportionally larger than the pattern. So to fit my 37″ bust, I’d make a M/size 36″ using 1″ of negative ease, but would need to change the waist to 34″ and the hips to at least 44″. (That’s right, I love y’all enough to disclose my real measurements.) And being on the taller side, I’ll probably want to add some length to the body, too.
So armed with my new measurements, I’ll multiply my new waist and hip circumferences by the stitches per inch to get 204 waist sts, and 264 hip sts. The bust sts stay the same at 216 sts. So based on the shaping instructions, I would spread those decreases over about 24 rows, or every 6 rows 3 times, work plain for a short length on the waist, and then increase along a similar length to the pattern, once every other row 15 times, about 30 rows. Because I will add some length, I could re-figure those shaping areas to include a few more rows, or I could simply work more rows in plain sections, depending on the amount of length I want to add. An inch or two can easily be snuck into plain areas by divvying it up into smaller increments, while longer lengths will require a bit of recalculating on the shaping slopes. This goes for shortening lengths on petite sizes, too.
As another option, most top-down pullovers with plain Stockinette bodies can be completely, but easily, overhauled into a swingy, a-line shape! You can steadily increase along two “seam” lines on each side of the body tube until you reach the hem, bypassing the curved shaping altogether. Plot out your body length in rows and finished hem circumference in stitches to calculate your increase rate. With this method, you could take something like Campbell & 2nd, and frankensweater the top lace detailing onto a lower body shaped like this Prairie Lace Blouse.
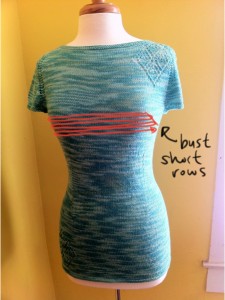
One last thing to consider, if you’re busty, is adding short rows to optimize fit. Horizontal short row shaping, worked in increasing rows along the front just under the fullest part of the bust adds not only a curved shape to conform to the bustline, but a bit of added length to avoid having the front hemline ride up higher than the back hemline. Amy Herzog, shaping genius, has a great short row tutorial; Knitty magazine offers an Q&A with Bonne Marie Burns about adding bust short rows, and Stitched Together has a handy worksheet to calculate short row shaping.
I hope that helps you modify my top-down sweater patterns into something that you love wearing! If you have any questions, drop me a line.
EDITED ON 1.24.13 TO ADD: I just discovered this fabulous waist shaping calculator from Interweave Press, that will take your measurements plus (or minus) your desired amount of ease and do the math for you! Check it out HERE.


